The easiest way to improve your security it to reduce your attack surface. If a server can’t be reached from the internet, then a bad actor can’t as easily scan it for vulnerabilities or attack it.
In Azure services are normally public, which is what you want for a Webserver, but not for a database necessarily. At the same time you want to comfort of SQL Server Management Studio or Azure Data Studio to manage your database, so you need a way to connect to the database without exposing it to the internet.
The answer is Azure Virtual Networks (or vnets). Basically a private network you connect all your services too and only expose the ones you want to the internet. That takes care of the security aspect, but you’ll also need a VPN to connect from your computer to the vnet to manage the services inside it.
My Journey to Vnets
A recent project of mine demanded a higher security standard for the deployment. The two trade offs that come with increased security are usually usability and cost. The only usability concern for a vnet setup is the initial setup and then gaining access to services inside the vnet from your own computer. This blog will take you through the setup process and includes a VPN server that allows you to connect to the vnet from your computer.
The additional cost over a standard setup using Wireguard as the VPN is about $10/month for the VM it runs on. vnets on the other hand are free of charge in Azure as is the private link infrastructure required to make it all work with another.
There is one exception you need to be aware of: If you are using Service Bus in your infrastructure only the Premium tier allows connecting to a vnet which comes in at over $700 per month (vs. $10 for the Standard SKU).
Steps
In this guide I’ll take you through through the following steps:
- Setup a vnet
- Connect a Webserver to the vnet but also expose it to the internet
- Connect a SQL Server to the vnet but not expose it to the internet
- Setup a VPN server to connect to the vnet from your computer
Note that SQL Server is used as an example here, but the same steps apply to any Azure service that supports private links (which most do). The only difference is the private DNS zone that is created for each service.
Make sure you create each of the services below in the same region so you can connect them with each other.
Step 1. The Virtual Network
A very simple way to imagine a vnet is to think of it as small network switch in the Azure datacenter. All your services ave cables to that vnet and all communication runs only through that switch. Because no one else has a cable into the switch, they cannot see or access your services.
To create a vnet, head over to the Azure Portal and create a new service. Search for “Virtual Network” and you can mostly use the default settings with a few exceptions:
Virtual Network - Security Tab
For this you can also use the default settings, but let’s quickly have a look at the options that are available here.
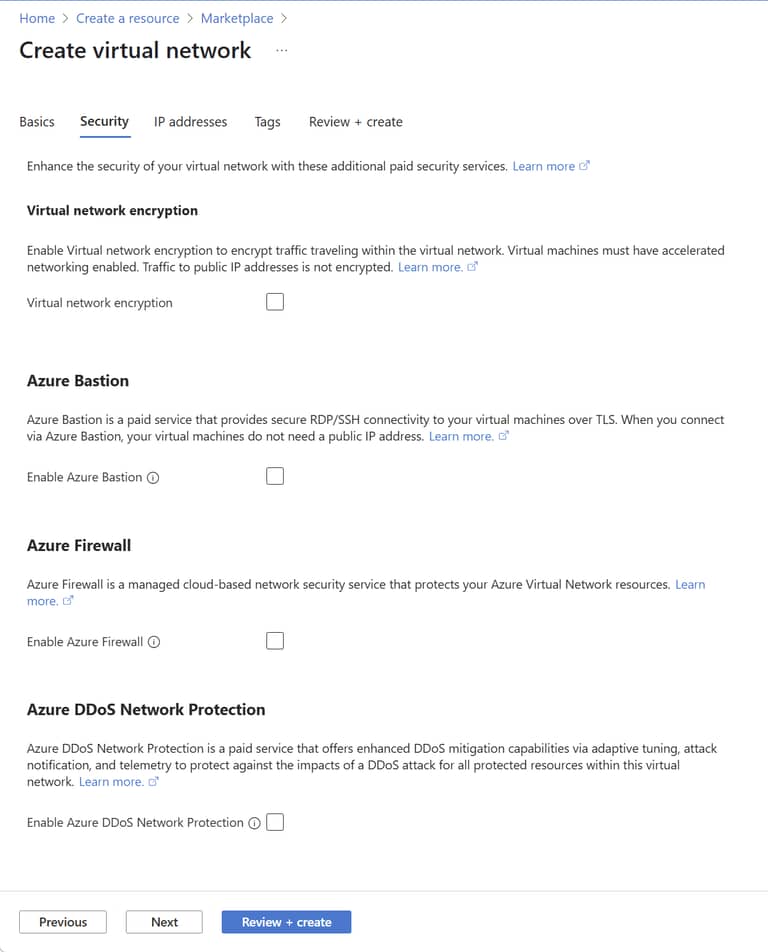
- Virtual Network Encryption: While this would be great, it isn’t supported for Azure Services and only for Azure VMs with “Accelerated Networking” enabled.
- Azure Bastion: This is a service that allows you to connect to your Azure VMs via the Azure Portal without exposing them to the internet. Unfortunately, this service is not available for AppServices and SQL Servers. You can use it for your VMs though, but in this guide we will use a VPN server instead.
- Azure Firewall: By default only services inside the vnet can reach other services in the vnet but they can reach the outside world (i.e. public internet). If you want to have more control over that, or include threat detection, this is a service to consider, but comes at a signficant cost monthly cost (~250 EUR + data transfer, per month).
- Azure DDoS Network Protection: In our scenario this would protect the one publicly reachable AppService, but again comes at a significant cost (~3000 EUR per month). For most scenarios Cloudflare will offer this services for free.
Virtual Network - IP Addresses Tab
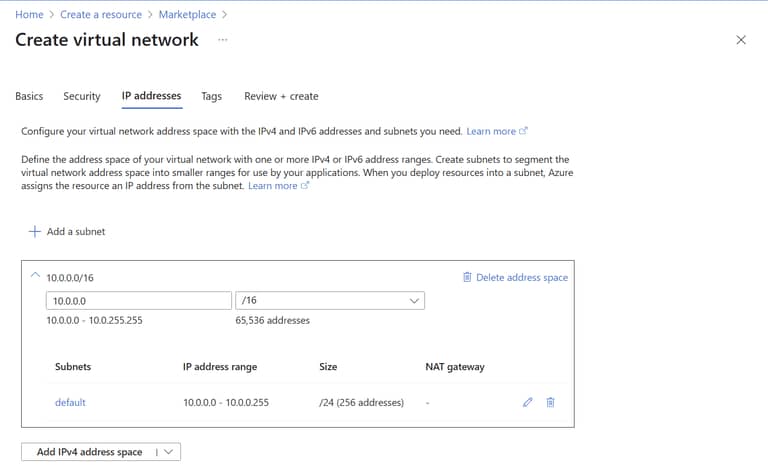
Subnets are ranges of IP addresses that the services in your vnet can be assigned. Each service needs at least one IP.
You could use the default subnet to assign IPs to virtual machines for example, but subnets can also be created with delegation. That means a specific IP range will be managed by Azure’s AppServices for example for any AppService you add to the vnet. We will see this in the next step when we add the AppService.
Step 2. AppService
For your AppService we will both create a public endpoint that you can reach from the public internet, but also connect it to the vnet so it can reach the database we’ll create in the next step.
Create a new service AppService (and AppService Plan) in Azure and configure as you would normally until you get to the networking tab.
Important note: Do not create the database in this step as it prevents adding it to the vnet.
App Service - Networking Tab
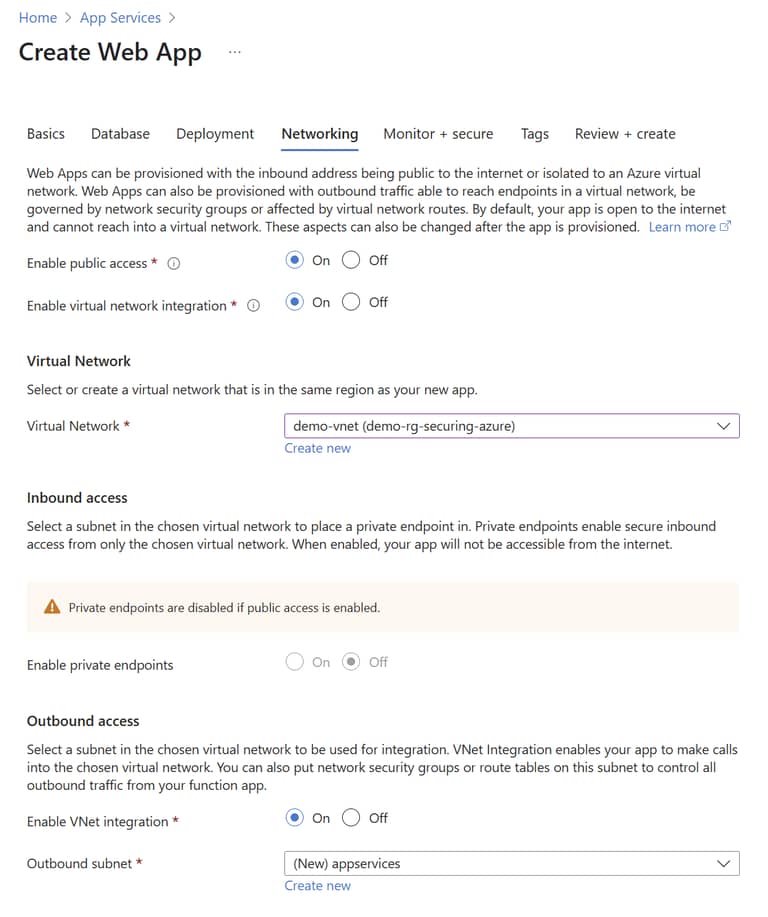
In the networking tab we will enable all available options. Inbound access is disabled because you can reach the server via it’s public endpoint from inside the vnet.
-
Virtual Network: choose the existing vnet from the list.
-
vnet integration in Outbound Access: Create a new outbound subnet with the following options.
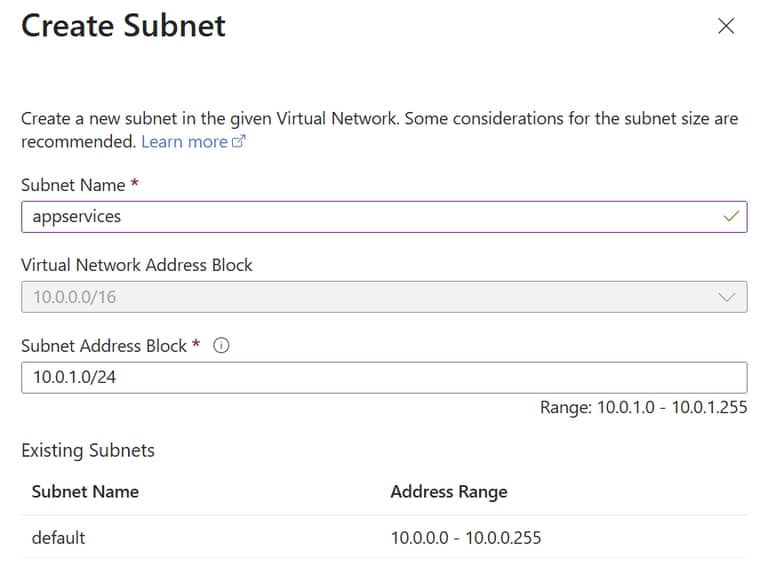
This is the subnet which is delegated to Azure AppService for managing any AppServices you create (you will choose the same subnet for any additional AppService you create).
Keep in mind the vnet in this example is 10.0.0.0/16, which means any address from 10.0.0.1 to 10.0.255.254 can communicate with each other. The subnet you are creating here will be created for 10.0.1.0/24, so the range for AppServices is 10.0.1.1 to 10.0.1.254 but of course they can communicate with the full range of IP addresses in the vnet. One AppService requires more than one IP assignment for some of the Azure internal services like SCM, but if you run out you can create another subnet also delegate to AppServices.
Step 3. SQL Database
For the database we will use Azure SQL and only make it available to the vnet, not exposed to the public internet.
Create a new service SQL Database (and SQL Server) in Azure and again configure as you would normally until you get to the networking tab.
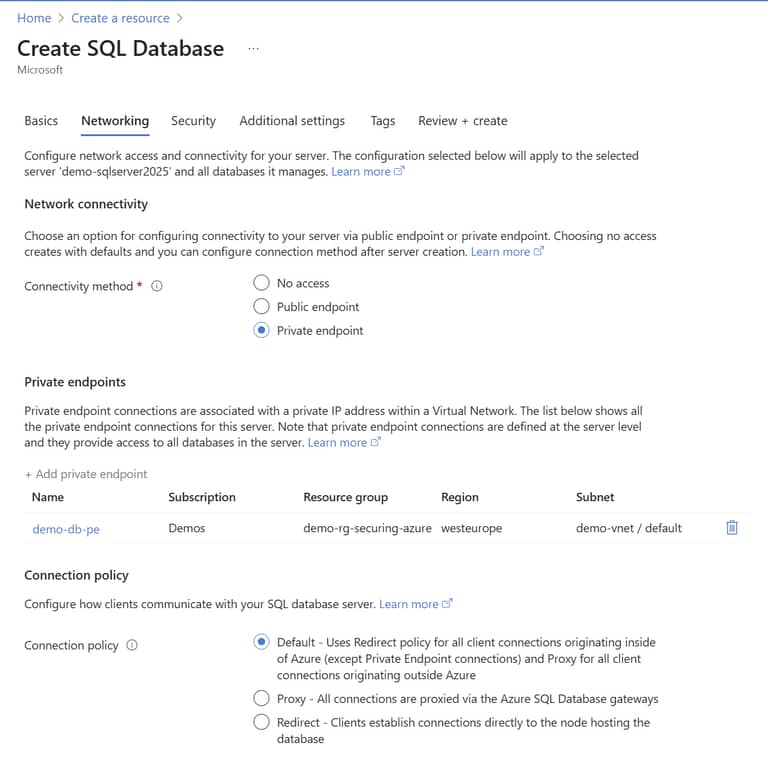
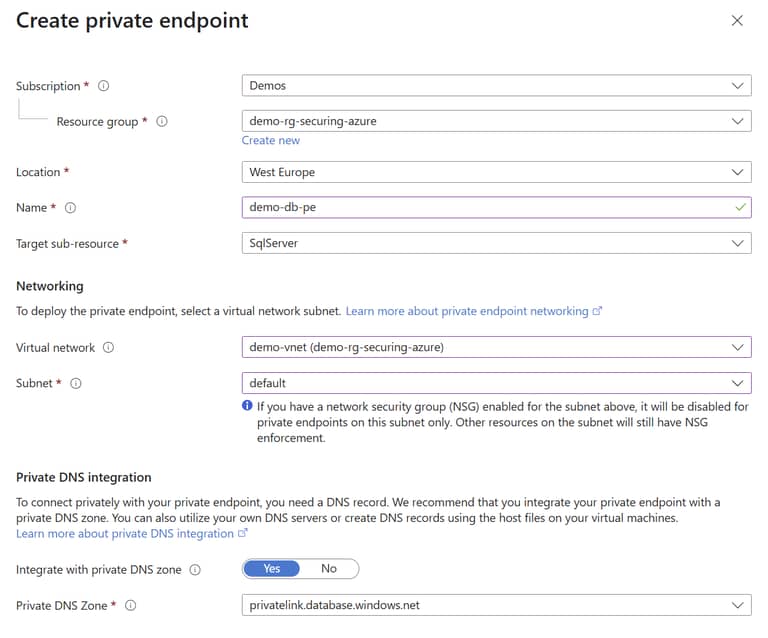
Change the connectivity method to Private endpoint. Next, click Add Private Endpoint and use the following settings:
-
Name: Enter a name for the endpoint. This is only used to identify the endpoint in the Azure Portal not for any connection purposes.
-
Virtual Network: Select the vnet you created above and select the default subnet. This means an IP address from that range will be assigned to the SQL Server.
-
Private DNS integration: You need to enable this and use the defaults, but let’s dive into what’s happening here briefly:
Understanding Private DNS Zones and Private Links
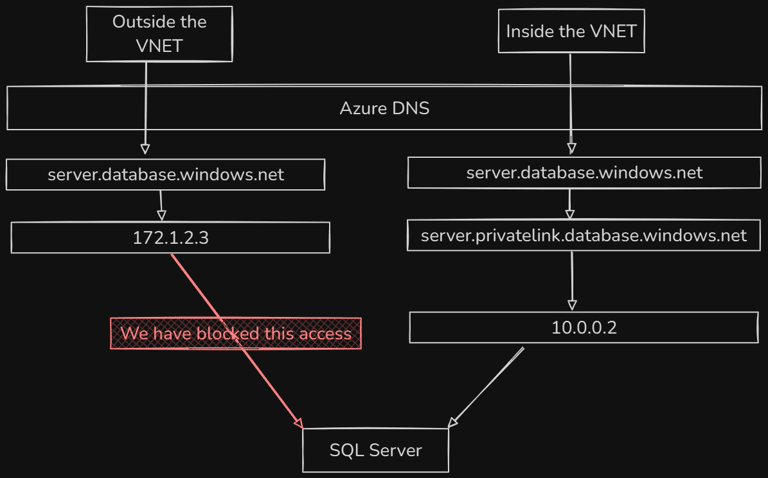
Think of a private DNS zone as an override for a public DNS zone. This override is active only for DNS requests from inside the vnet. So if you AppService tries to resolve myserver.database.windows.net from inside the vnet the Azure DNS service will first look if there is a private DNS zone that matches that address and use that to reply with the internal IP address.
If you try to resolve myserver.database.windows.net from your own computer (without being connected to the vnet) you will receive the public IP address and any attempt to connect to it will fail because we’ve disabled public access.
Each of the Azure services has a dedicated DNS suffix. For SQL Server it’s
database.windows.net, for Blob storage it’sblob.core.windows.net. When you want to add a private DNS zone for a service, you prefix that dedicated DNS suffix withprivatelink, so you for SQL Server you createprivatelink.database.windows.netand any SQL server linked to that zone gets an additional addressmyserver.privatelink.database.windows.netwhich resolves to the private IP.
A private DNS zone and the necessary name record are created when you enable that private DNS integration for an Azure service.
Watch out for this common trap: if a service inside a vnet is not resolving to the private IP (but rather to the public IP) then most likely the private DNS zone has not been linked to that vnet. For a simple setup like the one here it’s done for you automatically, but if you have a more complex setup this is an easy error to make, just check your linked vnets.
Step 4: Add VPN Server
This last step is necessary in order for you to still be able to manage any Azure resources you have now hidden behind the vnet. You will connect to the vnet using a VPN (which gives you an IP that can communicate with the other services in the vnet).
Azure does have it’s own Azure VPN Gateway service that allows you to create a VPN server. While this is the easiest and built-in way of getting access it comes with a monthly cost of around 140 EUR for the VpnGw1 SKU. (Note that they do offer a Basic SKU at 25 EUR per month, but this does not support DNS resolution and is therefore not usable for our scenario.)
For less than 10 EUR per month you can create a Wireguard VPN server on an Azure VM. This is a bit more work, but if you are looking for a cost-effective solution, this is the way to go.
Create a new virtual machine in Azure. For the purposes of the VPN you can create the smallest available Linux VM (currently B1ls). Again, you can use all the defaults (allthough for this purpose you can switch the hard disk to Standard HDD) until you get get to the Networking tab.
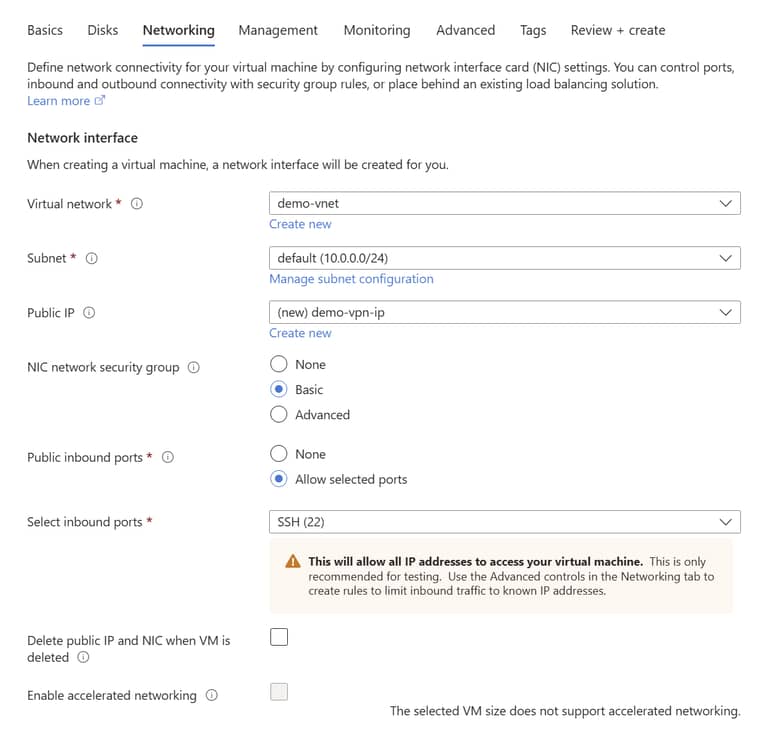
Keep in mind this VM will get a public IP and connect to the vnet to fulfill it’s service. By default only port 22 for SSH is enabled, so once the VPN is created head over to it’s Network Settings to add the additional rule that Wireguard requires.
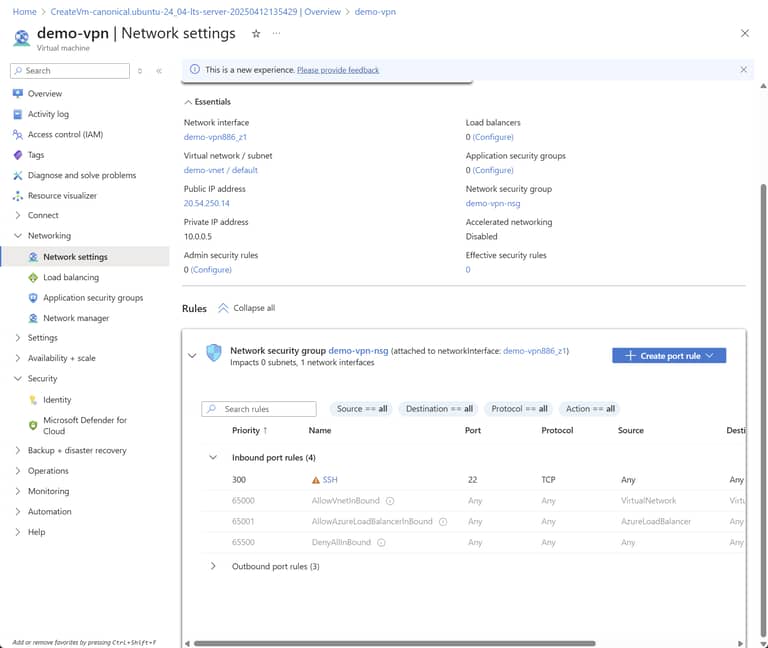
Click “Create port rule”.

Change the Destination port ranges to 51820 (the default Wireguard port). This will allow incoming connections to the VPN server. Press add to create the rule.
Step 5: Install Wireguard
Now connect to the VM via SSH (using the IP found on the Overview page of the VM in Azure).
Wireguard is a fairly simply VPN server to install. You can find the official installation instructions here or use the following bash script. Save it as wireguard-server-setup.sh and then run these two commands to make it executable and execute it.
chmod +x wireguard-server-setup.sh
sudo ./wireguard-server-setup.sh
The script will install Wireguard, generate a private and public key for the server and create a configuration file:
#!/bin/bash

# Check if the script is run as root
if [ "$(id -u)" -ne 0 ]; then
    echo "This script must be run as root!"
    exit 1
fi

# Variables
WG_CONF_DIR="/etc/wireguard"
WG_SERVER_CONF="$WG_CONF_DIR/wg0.conf"
SERVER_PRIVATE_KEY_PATH="$WG_CONF_DIR/server_private.key"
SERVER_PUBLIC_KEY_PATH="$WG_CONF_DIR/server_public.key"
SERVER_LISTEN_PORT=51820
SERVER_IP="10.0.100.1/24"
CLIENT_IP="10.0.100.2/32"

# Install WireGuard if not already installed
if ! command -v wg &> /dev/null; then
    echo "WireGuard is not installed. Installing..."
    apt update
    apt install -y wireguard
else
    echo "WireGuard is already installed."
fi

# Install iptables-persistent if not installed
if ! dpkg -l | grep -q iptables-persistent; then
    echo "iptables-persistent not found. Installing..."
    apt install -y iptables-persistent
fi

sudo sysctl -w net.ipv4.ip_forward=1
echo "net.ipv4.ip_forward=1" | sudo tee -a /etc/sysctl.conf

# Create the necessary directories
echo "Creating configuration directories..."
mkdir -p "$WG_CONF_DIR"

# Generate the server's private and public keys
echo "Generating server keys..."
wg genkey | tee "$SERVER_PRIVATE_KEY_PATH" | wg pubkey > "$SERVER_PUBLIC_KEY_PATH"

# Extract the server's private and public keys SERVER_PRIVATE_KEY=$(cat "$SERVER_PRIVATE_KEY_PATH") SERVER_PUBLIC_KEY=$(cat "$SERVER_PUBLIC_KEY_PATH")

# Create the WireGuard server configuration file
echo "Creating WireGuard server configuration file..."
cat > "$WG_SERVER_CONF"<<EOL
[Interface]
PrivateKey = $SERVER_PRIVATE_KEY
Address = $SERVER_IP
ListenPort = $SERVER_LISTEN_PORT
PostUp = iptables -t nat -A POSTROUTING -s 10.0.100.0/24 -j MASQUERADE
PostDown = iptables -t nat -D POSTROUTING -s 10.0.100.0/24 -j MASQUERADE

[Peer]
PublicKey = todo
AllowedIPs = 10.0.100.2/32
EOL
Running it will install Wireguard and create a configuration file in /etc/wireguard/wg0.conf. The script will also install iptables-persistent which is used to make the iptables rules (i.e. network forwarding) persistent across reboots which you’ll be prompted to confirm twice (once for making iptables permanent and another for IPv6 rules).

When the script finishes, we now have to edit the configuration file to add the client peer settings.
Wireguard in it’s simplest form is just two computers that encrypt communication between them using the public key of the other computer. In the server configuration the peer is your computer. On your computer the peer is the VPN server.
We need to add the public key of your computer (the VPN client) to the server’s configuration.
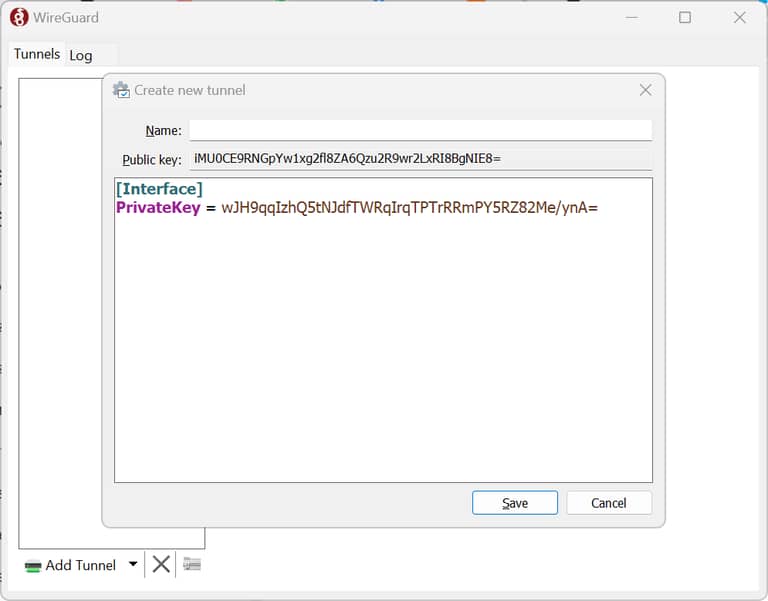
Install the Wireguard client on the computer you want to use to connect to the VPN. Launch it and hit CTRL+N to create a new empty tunnel. This will give you a public key and private key. Note the public key is the one at the top which you will need to copy into your clipboard.
Now in the terminal of the server open the wireguard configuration file using:
sudo nano /etc/wireguard/wg0.conf
At the bottom of the file you will find a [Peer] entry with a todo. Paste the public key of the client you just copied to the clipboard and replace the todo. Press Ctrl+K to exit the editor and confirm you want to save the file.
Now we need to create the corresponding configuration on the client computer. In the VPN client window (the one where you just copied the public key of the client), add these lines below the PrivateKey entry:
Address = 10.0.100.2/24
DNS = 168.63.129.16

[Peer]
PublicKey = SERVER_PUBLIC_KEY
Endpoint = YOUR_PUBLIC_IP:51820
AllowedIPs = 10.0.0.0/16, 10.0.100.0/24
PersistentKeepalive = 25
Replace YOUR_PUBLIC_IP with the public IP address of the VM you created in Azure.
Replace SERVER_PUBLIC_KEY with the public key of the server which you can get from the server by running this command in the SSH terminal:
sudo cat /etc/wireguard/server_public.key
When you are finished it should look something like this:
[Interface]
PrivateKey = wJH9qqIzhQ5tNJdfTWRqIrqTPTrRRmPY5RZ82Me/ynA=
Address = 10.0.100.2/24
DNS = 168.63.129.16

[Peer]
PublicKey = r9bq6FJrFUtM4kGJCVquQWr+irFdgLI08baH0Xswhzs=
Endpoint = 20.54.250.14:51820
AllowedIPs = 10.0.0.0/16, 10.0.100.0/24
PersistentKeepalive = 25
Specify a name for your connection and then save the configuration. If you now hit “Activate” it will connect your compute to the VPN and into the vnet in Azure.
Testing your VPN connection
Run the following command on your computer to see if you can resolve the domain name of the SQL server you created. Replace the demo-sqlserver2025 with the name of the resource you created above.
nslookup demo-sqlserver2025.database.windows.net
The result should be something like this. The first address must be 168.63.129.16 which is Azure’s DNS server. Then the second address should be the private IP address (starting with 10.0) of the SQL Server you created in Azure. If this displays the public IP address (something that does not start in 10.0) then check the configuration of the VPN server and VPN client again.
Server:  UnKnown
Address:  168.63.129.16

Non-authoritative answer:
Name:    demo-sqlserver2025.privatelink.database.windows.net
Address:  10.0.0.4
Aliases:  demo-sqlserver2025.database.windows.net
That’s it! Now you can start SQL Management Studio and try to connect to the database.
To connect to the SQL server from the AppService you use the default connection string just like if it had a public endpoint. Do not use the
myserver.privatelink.database.windows.netaddress as this will lead to a invalid certificate and the connection will fail.
VPN Alternative 1: Azure Bastion
Azure Bastion is a service you can deploy into your vnet that let’s you connect to internal virtual machines via SSH or RDP. You cannot connect directly to Azure services (e.g using SQL Server Management Studio) but you could create a dedicated devops machine inside your vnet if you don’t want the hassle of creating a VPN server.
Bastion allows you to connect via the Azure portal (in your browser) but from my experience the performance is very bad and I would only use it in an absolute emergency. It’s much better if you setup a RDP connection via a dedicated RDP client.
VPN Alternative 2: Directly RDP into a Devops Virtual Machine
If you want to avoid VPN and Bastion, you could rely on Azure Firewall alone to protect a virtual machine you setup just for devops inside your vnet. Similar to how SQL Server requires you create a new client rule if you connect from a new IP address, you can setup the inbound rules for a virtual machine the same way, except the RDP client natively does not offer you a screen to add a new rule when you connect like SQL Server Management Studio does.
Use the following Powershell script to add your current IP to the firewall (and remove any previous rules you created). Replace the necessary parameters at the top.
# Azure RDP Access Script
# This script logs into Azure, gets your current public IP address,
# and adds an inbound rule for RDP (port 3389) to a specified Azure VM

# Parameters - modify these for your environment
param(
    [string]$ResourceGroupName = "...",
    [string]$VMName = "...",
    [string]$NetworkSecurityGroupName = "...",
    [string]$RuleName = "Allow-RDP-From-MyIP",
    [int]$Priority = 100,
    [string]$Direction = "Inbound",
    [string]$Access = "Allow"
)

# Check if already logged in to Azure
Write-Host "Checking Azure login status..." -ForegroundColor Cyan
$loginStatus = az account show 2>$null

if ($LASTEXITCODE -ne 0) {
    # Not logged in, prompt for login
    Write-Host "Not logged in to Azure. Initiating login process..." -ForegroundColor Yellow
    az login

    # Verify login was successful
    if ($LASTEXITCODE -ne 0) {
        Write-Host "Azure login failed. Please try running the script again." -ForegroundColor Red
        exit 1
    }
} else {
    # Already logged in, display account info
    $accountInfo = $loginStatus | ConvertFrom-Json
    Write-Host "Already logged in to Azure as: $($accountInfo.user.name)" -ForegroundColor Green
    Write-Host "Subscription: $($accountInfo.name) ($($accountInfo.id))" -ForegroundColor Green
}

# Get your current public IP address
Write-Host "Getting your current public IP address..." -ForegroundColor Cyan
$myPublicIP = (Invoke-RestMethod -Uri "https://api.ipify.org?format=json").ip
Write-Host "Your current public IP address is: $myPublicIP" -ForegroundColor Green

# Format the IP address with CIDR notation to specify a single IP
$sourceAddressPrefix = "$myPublicIP/32"

# Check if a rule with the same name already exists and delete it
Write-Host "Checking for existing rule with name: $RuleName..." -ForegroundColor Cyan
$existingRule = az network nsg rule show --resource-group $ResourceGroupName --nsg-name $NetworkSecurityGroupName --name $RuleName 2>$null

if ($LASTEXITCODE -eq 0) {
    Write-Host "Found existing rule with same name. Deleting..." -ForegroundColor Yellow
    az network nsg rule delete --resource-group $ResourceGroupName --nsg-name $NetworkSecurityGroupName --name $RuleName
    Write-Host "Existing rule deleted." -ForegroundColor Green
} else {
    Write-Host "No existing rule with the same name found." -ForegroundColor Green
}

# Create the security rule
Write-Host "Adding RDP rule to Network Security Group: $NetworkSecurityGroupName..." -ForegroundColor Cyan
az network nsg rule create `
    --resource-group $ResourceGroupName `
    --nsg-name $NetworkSecurityGroupName `
    --name $RuleName `
    --protocol Tcp `
    --direction $Direction `
    --priority $Priority `
    --source-address-prefix $sourceAddressPrefix `
    --source-port-range "*" `
    --destination-address-prefix "*" `
    --destination-port-range 3389 `
    --access $Access

Write-Host "RDP rule added successfully!" -ForegroundColor Green
Write-Host "You can now RDP to the VM using your public IP: $myPublicIP" -ForegroundColor Green

# Optional: Display details about the VM for RDP connection
Write-Host "Getting VM public IP address (if available)..." -ForegroundColor Cyan
$vmInfo = az vm show -g $ResourceGroupName -n $VMName -d --query "{name:name, publicIps:publicIps}" -o json | ConvertFrom-Json

if ($vmInfo.publicIps) {
    Write-Host "VM Name: $($vmInfo.name)" -ForegroundColor Green
    Write-Host "VM Public IP: $($vmInfo.publicIps)" -ForegroundColor Green
    Write-Host "You can RDP using: mstsc /v:$($vmInfo.publicIps)" -ForegroundColor Green
} else {
    Write-Host "VM doesn't have a public IP address directly assigned." -ForegroundColor Yellow
    Write-Host "You may need to connect through a jumpbox or VPN." -ForegroundColor Yellow
}
Conclusion
Once you’ve mastered the terminology and understood the private link concept, there’s really nothing difficult or time consuming in setting up a vnet and protecting your Azure service behind it. The additional security this gives you outweighs the minimal additional effort required to get it all set up. And if you ever have to pass a security certification like ISO, SOC2 or similar, this kind of setup checks many of the requirements.
Additional steps I recommend to further strengthen your setup are:
- Use Entra identities for communicating between your services
- Add Frontdoor in front of your AppServices
- Use BICEP in general to not only deploy services, but also document their deployment and configuration.